When you’re a “Lary,” you have enough problems without trying to figure out all of the different laryngectomy supplies.
I was fortunate to have my laryngectomy at Emory Winship Cancer Center in Atlanta, One of the best facilities in the nation. Others of you have had similar experiences with major cancer centers like Johns Hopkins, M.D. Anderson, etc. But in reading what some people write in the Lary’s Speakeasy Facebook group, many laryngectomees had their surgeries at smaller facilities and didn’t get the information they should have gotten.
I can’t say if this was because of ignorance or incompetence, but the fact that anybody had to go through a life altering procedure like this and not get all the knowledge they needed is, in my opinion, unacceptable.
That’s the reason for this article. To help educate those who didn’t get the knowledge they should have, and also for their caregivers.
Laryngectomy Supplies
The world of laryngectomy supplies is a big one. What is available, where to get them, and how to pay for them.
Now, I’m not a doctor. Everything in this article either comes from my experience, or from the experiences of other Larys. Consult your doctor or SLP before making any changes to your care.
In this article I’ll talk about:
- Lary Tube
- Lary Button
- Collar
- Lary Clip
- Baseplate
- HME
- Suction Machine
- Brush
- Saline bullet
- Tac Wipe/Glue
- Adhesive remover
- Skin protector
- TEP
- Electrolarynx
- Flush bulb
- TEP plug
- TEP catheter
- Shower guard
Yeah, I know it’s a lot, but this is something we need to contend with every day. It’s our life now. But it’s something we get used to.
So let’s look at the supplies.
All photos are of Atos products, but InHealth has similar laryngectomy supplies
Stoma Supplies

Our stoma is a delicate part of us. We need to take care of it the best we can. Here are the laryngectomy supplies that help us talk care of our stoma.
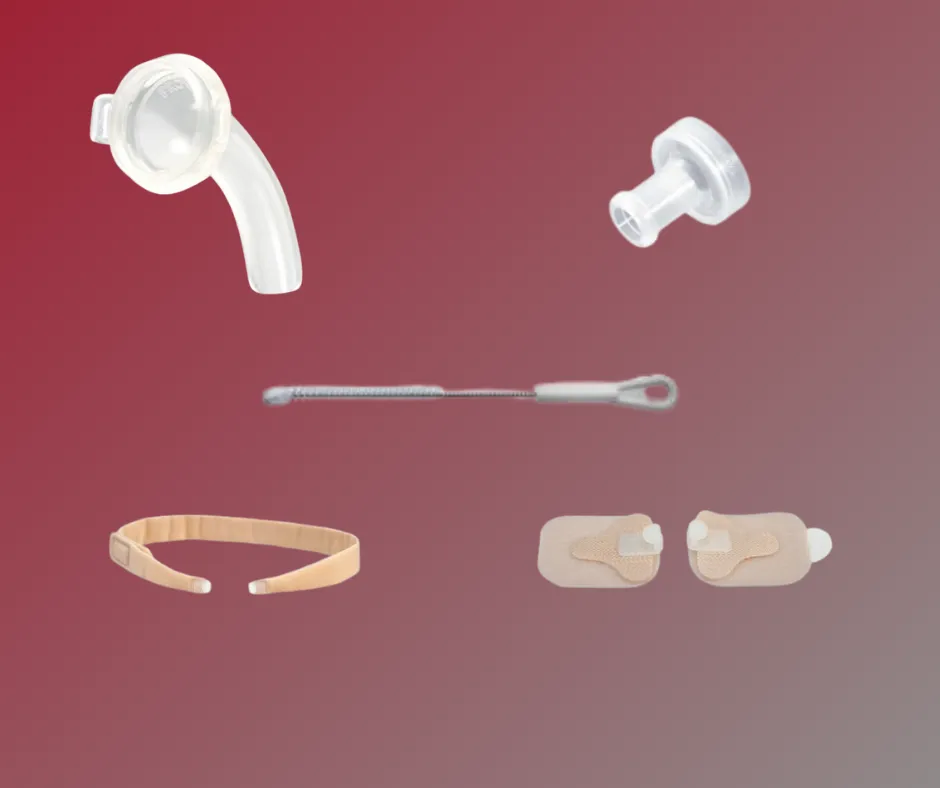
Lary Tube
At first, we have a tube that sticks down into our stoma. That is called a Lary tube. The purpose of the tube is to help keep the stoma open, as with any new hole we get in our body, it can tend to close up on us. And since we breathe out of that hole, closing up would be a bad thing. Thus, the Lary Tube. They come in different sizes, so when ordering one, make sure to get the correct size.
Lary tubes come in different versions also. Fenestrated (has holes in it) or non-fenestrated, It’s worn with a collar or Lary clip (see below), or baseplate (later in this article).
I’ll explain the purpose of the fenestrated tubes in the “speaking supplies” section, along with baseplates.
A tube brush is useful for cleaning mucus out of the tube, which needs to be done daily, if not multiple times a day. It depends on the amount of mucus you have.
Collars
Lary tubes are at first held in place by a collar, sometimes called a “tube holder.” These are lightweight bands with velcro straps to attach to the tube. Some are disposable, and some are washable to be used for a longer period. I recommend to use the disposable ones at first, as you will have a lot of gunk on your neck, Aquaphor, Silvadene, etc. to help heal the scars and any burns from radiation treatment.
After your scars and/or burns have healed, you can use the washable ones. Then you may graduate to Lary clips.
Lary Clips
Lary clips are small adhesive pads, maybe 1” x 1 ½” that stick to the skin on either side of your stoma. Then a velcro clip attaches to the tube and velcros to the pad. In my opinion, this is more comfortable than the collar.
Lary Button
The Lary button is like a short tube. It doesn’t stick far down into the trachea. It’s a bit harder to insert and remove, and it can sometimes hold itself in place without a clip or collar.
Lube
It is advisable to use some sort of lube when inserting a Lary tube or button, as the stoma is very delicate and can be scratched or irritated easily. You can get special lube for this, but good old K-Y Jelly works wonderfully.
Now, when I was using a tube, I looked at some store brand K-Y type jelly, and they contained ingredients that I wouldn’t want in my stoma. My advice is to stick with K-Y.
Breathing Supplies
Breathing, as you can imagine, is very important to us. Having to breathe through a hole in our neck presents issues that nose breathers don’t have, such as cold and/or dry air, mucus clogs, etc.
We have supplies to help us with those issues.

HME
Our lungs don’t do very well with cold and/or dry air, so we have sinuses that help warm and moisturize the air as we breathe.
The issue we neck breathers have is, we don’t breathe through our nose, so no air passes through the sinuses. That means we have to rely on other means.
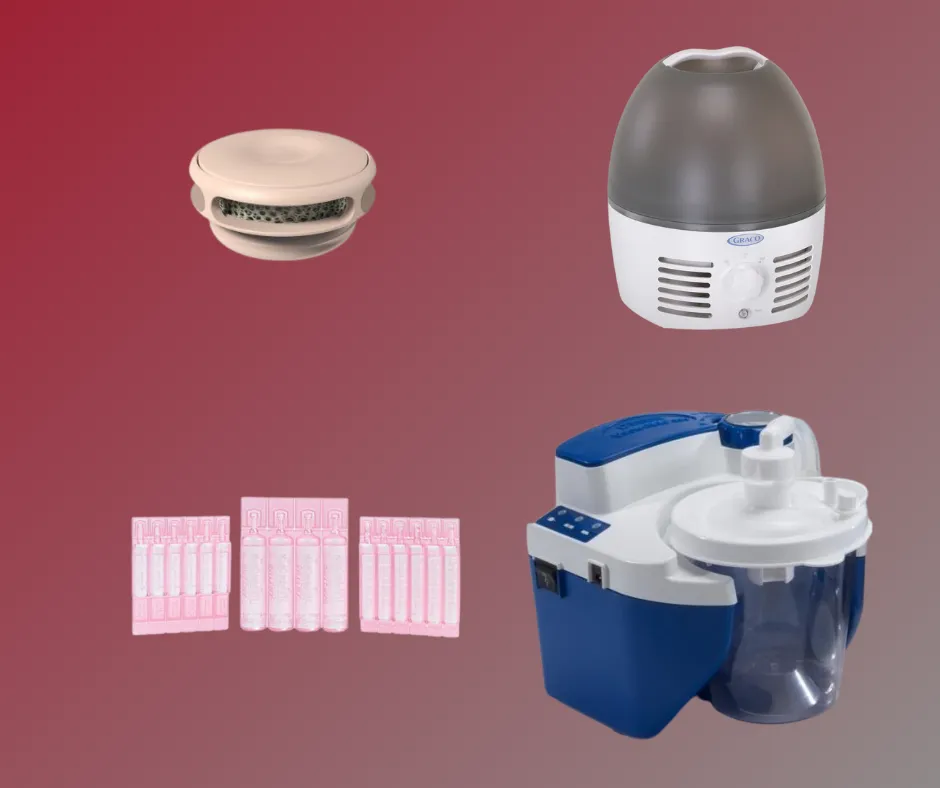
HME stands for Heat and Moisture Exchanger. Basically, it’s a round disk with a sponge-like filter in it. It contains Calcium Chloride, which traps heat and moisture from when we breathe out and uses that to warm and moisturize the air we breathe in.
The HME snaps into a Lary tube, button, or a baseplate.
There are many different types of HMEs, but they basically fall into four categories:
- Normal
- Active
- High filtration
- Night time
Atos has five types of HMEs: Home, Go, Energy, Protect, and Night.
- Home being for normal day-to day use.
- Go is for when you’re out and about. It has a bit less filtration so you can breathe better.
- Energy is for when you are more active, and it has even less filtration.
- Protect is high filtration.
- Night is for sleep, it has the highest moisturization.
InHealth basically has two types of HMEs.
- ClassicFlow, which is for both day and night.
- EasyFlow, less filtration for more activity.
Note: both Atos and InHealth have two lines of products; the old, or legacy product, which is being phased out, and the current product. For the purpose of this article I only mention the current product.
The HME can also serve another purpose. It can facilitate the way we speak. I’ll get into that a bit later in the article.
Humidifier
The HME is supposed to take the place of the humidifier, but for some people, especially those in dryer climates, the humidifier is also needed.
Humidifiers can be large for home use, or smaller and portable.
Saline Bullets
Saline bullets are small vials of a saline solution that we crack open and squirt down our stoma. This causes us to cough violently, which helps to break up any mucus plugs that can cause restrictions to our breathing. It ain’t fun, but it’s better than not being able to breathe.
Suction Machine
Sometimes HMEs, saline bullets and humidifiers aren’t enough and we might need a suction machine to suck out any built-up mucus in our trachea. This is especially for people who don’t have a strong enough cough to expel it.
Speaking Supplies
There are basically three ways we are able to speak after a laryngectomy:
- Electrolarynx
- TEP
- Esophageal Speech

Electrolarynx
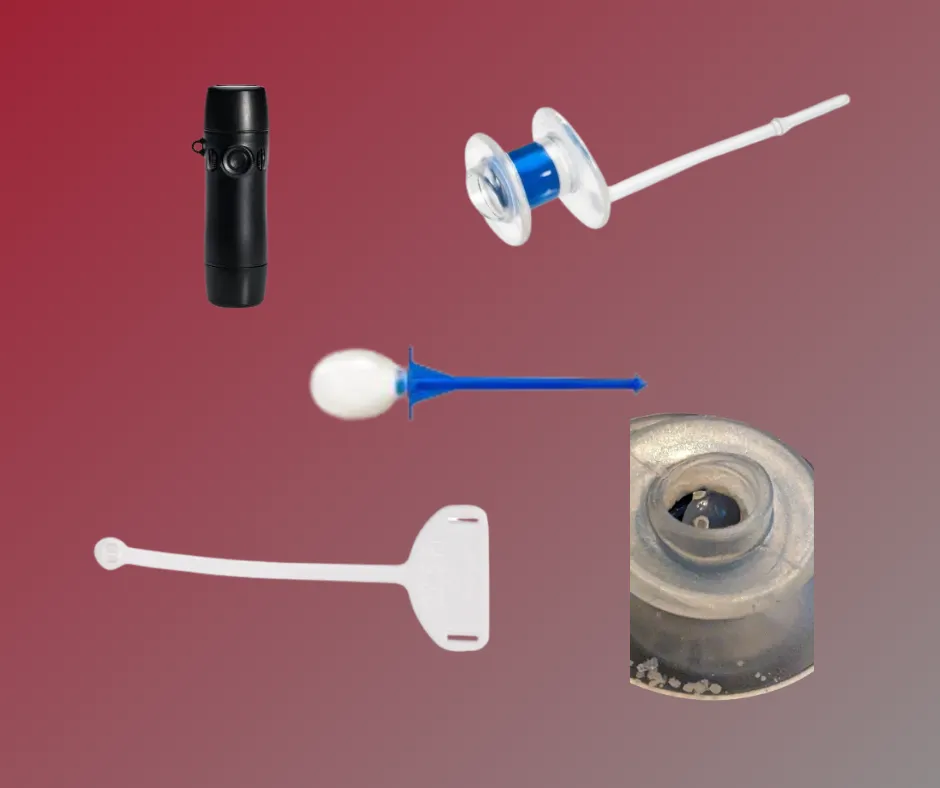
The electrolarynx (or “EL”) is a device which is pressed against the neck and vibrates. The user is able to mouth words and speak this way. Some people aren’t able to use it against the neck so they use an “oral adaptor,” otherwise called a “straw.” This pushes the vibrations into the mouth. The sound with either is robotic, but many ELs have the ability to change pitch, which makes the sound better.
See this video of Tony Talmich, a master of the electrolarynx.
TEP
The TEP, which stands for TransEsophageal Prosthesis is where a surgeon punches a hole from the trachea into the esophagus. A small valve is inserted into the hole. The user presses a button on the HME, which prevents air from coming through it, thus forcing the air through the valve. The air causes tissue in the throat to vibrate and the user is able to speak. The valve is one-way, meaning air can go into the esophagus, but liquids cannot flow back into the trachea.
Unlike the EL, the TEP actually enables the user to impart more inflection into their speech. We can change pitch somewhat, and also volume.
Leaking
The TEP does have some drawbacks, though. One of which is leaking. Sometimes food can get stuck in the valve, which keeps it open allowing liquid to flow back into the trachea (called “leaking through”). This can cause aspiration, but mainly it just causes a cough.
Candida
Another culprit that causes leaking is candida, or yeast. This can build up in the valve and prevent it from closing. This was happening to me at first. I was only getting 4 weeks out of a TEP before having to get it changed. Thanks to Joe Wasserman in the Lary’s Speakeasy Facebook group, I got my SLP to prescribe Nystatin to daily brush inside the valve and also swish in my mouth and swallow. As of this writing, I am over 12 weeks with my latest TEP.
Update: I made it 13 weeks and started to experience some leaking. It was right before Thanksgiving so I figured I would go get it changed.
Leaking can also come from around the valve. This is caused by the valve being the wrong size or type. Your SLP will size you and may have to experiment with different types of valves in order to find the one that works the best. This is a trial-and-error process, especially at first.
When the TEP is first installed, the surgeon has to guess what size to put in. As swelling goes down you will need a smaller size, It could take a month for the swelling to go down completely and your SLP finds the right size.
Plug
When (not if) your TEP starts leaking, you can insert a plug into the hole. This will allow you to drink without the liquid seeping into the trachea. You cannot talk while the plug is in place, but you usually don’t have to wear it constantly. Only while drinking. And sometimes if you’re eating, the food blocks the opening enough that you don’t need the plug.
Note: the plug will not help a TEP that is leaking around.
Falling Out
One thing that can happen with a TEP is that it can fall out. This doesn’t happen very often, in fact it is pretty rare, but we need to be prepared in case it does (see “Catheter” below).
The valve can go one of two ways. One way is to the back, which means it falls into the esophagus and into the stomach. This isn’t dangerous, as it is just silicone and will eventually pass.
This happened to me once. It was my fault. I accidentally pushed it through while using the flush bulb. I wasn’t using my handheld mirror and flashlight and pushed a little too hard. As I tell people: “It all came out in the end.”
The other way it can go is to the front, meaning into the lungs. This can be highly dangerous as you would need to go to the hospital, get x-rayed, and have a doctor go down into the lung to retrieve it.
So if yours falls out, unless you are 110% sure it went to the back, head to the ER immediately.
The HMEs Role In A TEP
An HME has a floating button on the outside which is able to be pressed in, cutting off airflow and forcing air into the valve. The HME is held in place by snapping into a Lary tube, a Lary button, or a baseplate.
There is also a version of HME called a “hands free.” It can close off airflow by the user forcing air through it, thus not having to press on the button.

Baseplate
Note: The supply companies refer to baseplates as “adhesives.”
The baseplate is a round piece of silicone with a hole in the center and a plastic piece around the hole where the HME can attach. It is sticky on one side to enable it to adhere to the skin around the stoma.
Like tubes, they come in different types.
Atos has 4 types:
- Standard
- Sensitive – for sensitive skin.
- Night – which has a hydrogel adhesive to help your skin recover overnight. These are not as good for talking, as they blowout easily.
- Stability – Has a larger plastic area for deep set stomas (this is the one I use).
Inhealth has 2 types:
- AccuFit – standard
- HydroFit – Lighter, water-based adhesive
Baseplates can last a few days, or less than one. What happens is the adhesive gets weak, and allows air to escape instead of flowing through the valve. We call this a “blowout.” There is tape that you can use to help seal it. I use this one, but eventually it will have to be changed. This is about a 15-minute process, and the wearer shouldn’t talk for about 20-30 minutes after putting a new one on.
Skin Barrier
A skin barrier helps protect the skin from the adhesive on the baseplate. It is a wipe in an envelope like a wetnap.
Skin Tac / Silicone Glue
Skin Tac is a wipe like the Skin Barrier. It adds an additional layer of adhesive to the baseplate. Likewise, silicone glue, which comes in a bottle, can be used. If the baseplate isn’t adhering on it’s on, try both, and use the one that works best for you.
Adhesive Remover
Another wipe, this one contains a light solvent to help remove the baseplate without damaging the skin, and also helps to remove any remaining adhesive before putting another baseplate on.
You can also use rubbing alcohol, but it’s pretty harsh on the skin.
TEP brush
The TEP brush is used to clean any particles of food that gets stuck in the valve. It’s a good idea to do this after every meal, if possible.
Flush Bulb
The flush bulb is also designed to blow air or water through the valve to remove any stuck particles. Caution has to be used when squirting water through the valve, so as to not let it leak into the trachea (do this once and you’ll figure out why.)
Fenestrated Tube
If using a Lary tube with a TEP, one needs a fenestrated tube. This type of tube has holes in it to allow air to flow into the valve.
Lary Button
The Lary button can also be used to speak with a TEP.
(The effectiveness of both the Lary tube and button depends on the amount of seal one can get to keep air from escaping).
Safety Supplies
Before we were Larys, we had our nose and sinuses to catch anything that shouldn’t be allowed to get into our lungs. Now the path from the outside world into our lungs can be wide open. Care is needed to protect our lungs from anything foreign.

Shower Covers
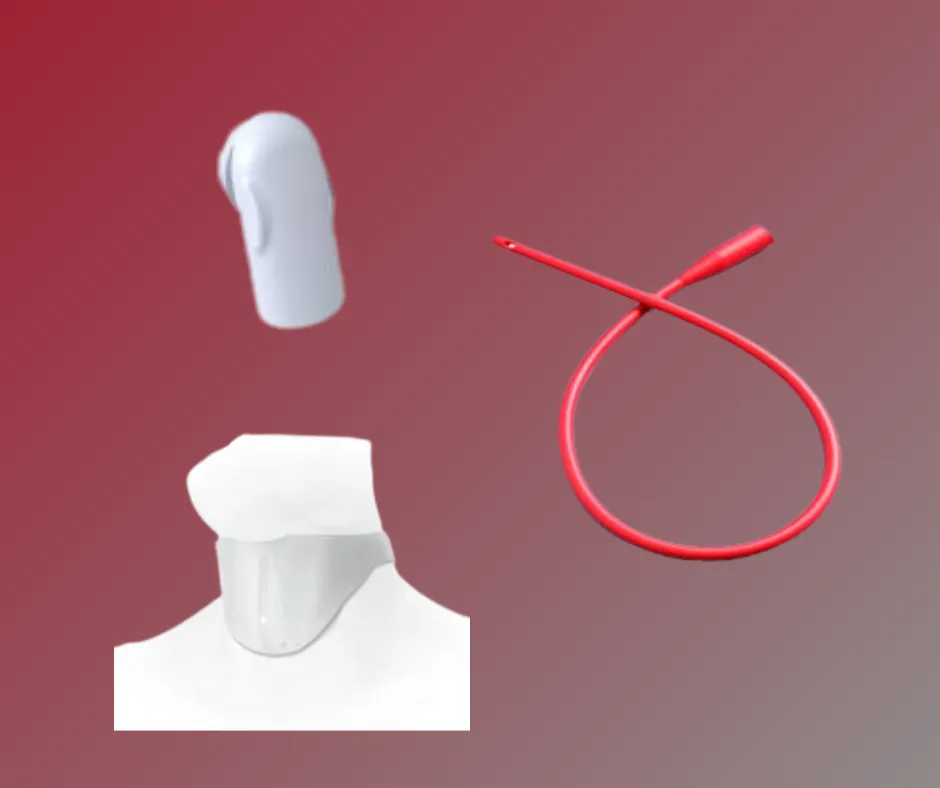
Shower covers help protect us from getting water into our stoma when showering. There are two basic kinds. One type clips onto the tube or baseplate like an HME. It is at a right angle pointing down so water cannot accidentally get in. The other type is a shield made of cloth or silicone.
Catheters
In the rare case that a TEP falls out, a catheter needs to be inserted into the hole. This will prevent it from closing up and having to have a procedure to open it up again. This needs to happen immediately, as the hole can close fast.
Thus it’s important to have a few of the correct size catheters handy, in your home, your car, your spouse’s car, at work, etc. You don’t have time to run back and get one.
Other Supplies
There are other less common laryngectomy supplies, here are links to both Atos and InHealth’s catalog.
Paying For Supplies
This is the hard part. These supplies can be expensive. Here are the ways we can pay for them.
Private Insurance
Private insurance, through your work or as an individual policy should cover a good part of the cost. The issue might be if your preferred supplier is an In-Network provider, or not. I use a Cigna Medicare Advantage plan, and at first Atos was not In-Network. Cigna covered the supplies, but at a higher cost. A few months later they became In-Network and my cost dropped by half. You can check whether your insurance carrier is In-Network with Atos here. InHealth uses various distributors for their products. To find the one nearest you, visit their contact page here.
Medicare
Medicare covers most all laryngectomy supplies, although you will have a 20% deductible.
Medicare Advantage
This works like Private Insurance. See above.
Medicaid
Medicaid should cover laryngectomy supplies as well, although this can vary from state to state. Atos’ site lists each state’s Medicaid that participates here.
Lary’s Speakeasy
Lary’s Speakeasy offers laryngectomy supplies at no cost to those in need. Note that since we depend on donations, supplies can be limited. See our supply request form here. And you can make monetary donations here, and supply donations here.
If you are a laryngectomee or a caregiver and you know of other supplies that should be added to this list, please leave a comment below, or contact me at larry.anderson@larysspeakeasy.org.
Larry is the website and social media manager for Lary’s Speakeasy.
He also operates two blogs, Larry In Atlanta, which is mainly personal observations, and The Tech Boomer, which offers tech advice to seniors.
Larry and his wife, Denise live in the southern Metro Atlanta area. He had his laryngectomy in April, 2022.

Well informed article! Thanks so much for putting it ALL out there. I had to learn on my own by reading and looking everything up on my own. Half of this stuff I didn’t even know about or even understood what is was. I’m 15 months and still learning. You’re article helped a me %100!!!
Thank You, Monika
Thank you so much! When I first started my blog it was a therapeutic tool for myself. I learned quickly that I could use it to help others too! So your words mean a lot to me.
You’re welcome. Like you, I had to learn on the fly.
Interested in knowing if people are getting coverage for adhesive remover. So far they are paying toward all other supplies, but nothing Ted he of remover. Didn’t know if this was standard or if this is something I should inquire more about from the insurance company.
Many are. Personally I am on a Cigna Medicare advantage plan and I pay a 20% co-insurance for all my supplies.
Very good article. It was long but kept my attention t0 the end. Good job!